meta data for this page
Ingaming Guideline Ropeways - Beginner
In this tutorial you are going to learn how to ingame a ropeway, based on the SampleModLift (Doppelmayr 4-CLF).
Carrier
At first, we create the prefab for our carrier. After we've done this, we put our Materials on our mesh.
Now insert the name of your prefab in the passage called “prefab”:

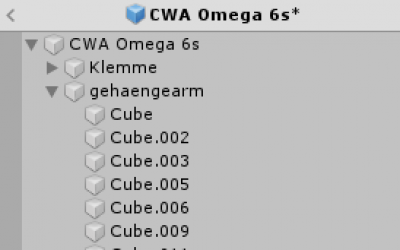
After we’ve done this, you have to figure out the Index from our suspension like it’s shown in the picture:
Now we will paste the index from our Suspension in the passage rotXIndex. Important: Parent your 3d model like this:
Now just put the index of your suspension in this passage.
Now, create your door (or bar) animation and put the index of your mesh or empty where you put your animation component on it:
Here is a little guide that shows you how create your door or bar Animation: Animation guide
That’s how the animation part in the data table should look right now:
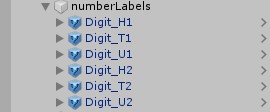
Now we will register the Number Labels in the data table, now it should look like this:
Now, that our carrier are already numbered you must of course still be able to sit in there. For this we Create an Empty and put a Box Collider on it, after you’ve done this, scale the collider and place it. Then crate two other emptys, one of them you call “cam” and the other one “leave”. After that you have to place the empty “cam” as you would like to have your camera for the seat. Now you place the empty “leave” slightly below the seat so that you don't get stuck in the ceiling of the cabin when you get out. Right away it should look like this:
Subsequently we register the Indexes from the seats. For this, we take the parent from the seat and register it right here:
Next, we take the index of the we empty called “cam”, and register it here:
We do the same thing with the “leave” Empty and put it in here:
Afterwards, copy the seats as many times as you need them for a carrier, in this case 6 pieces:
Since we’ve done this, we create two emptys, one of them we call “ExterieurCameraRoot” and the other one “ExterieurCamera” and parent it like this:
Put the Indexes in like this:
Now, you have a working Camera :).
Additional: If you want to have Static Cameras, just create an Empty and call it ExCam_xy and Place it like this:
That’s how the line in the data table should look like:
Last you have to place the seats for the NPC’s. For this, you create an empty called “skier_xy” and place it where you want your NPC's to sit, as with the seats, you must create as many of these as your carrier can hold. Parent it like this:
The only thing that’s left is to is to register everything in the mod.lua an create an Asset Bundle!
Congratulations, you ingamed your first carrier! :)
General
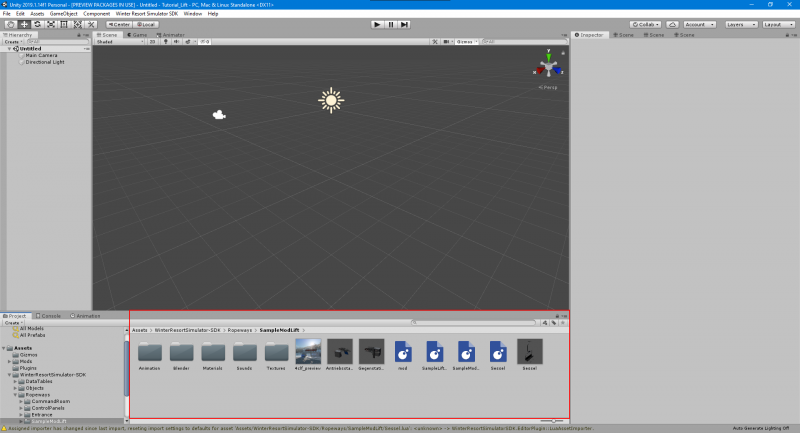
To create a ropeway for the Winter Resort Simulator you will need to install the Modding SDK. In our case, we name the Unity project “Tutorial_Lift”, but you can give it any name you'd like. After installing, you will need to browse to Tutorial_Lift\Assets\WinterResortSimulator-SDK\Ropeways and copy the folder SampleModLift.
Afterwards, head to Tutorial_Lift\Assets\Mods and paste the folder there. I will name it “Chairlift”, but of course also here you can name it whatever you want. Now you can open your project with Unity. You can see all files & folders in the project window on the bottom of the screen.
But what are all these files & folders even good for?
Animations-Folder: Here you can save all your animations.
Blender-Folder: In this folder all 3D models are saved. You can also save your models (.blend or .fbx) into this folder.
Materials-Folder: Here you can save all materials.
Textures-Folder: In this folder you can save all your textures.
4clf_preview: This is the preview image, which is displayed in the shop.
Antriebsstation: This is the valleystation prefab, which will be loaded by the game. For more accurate information, look here.
Gegenstation: This is the mountainstation prefab. For more accurate information, look here.
mod.LUA: In this file all information about your modification is given. For more info concerning this file, have a look at here.
IMPORTANT: You will need to add 2 extra lines to this file.
targetGame = “WRS-S2”,
supportsMultiplayer = true,
SampleLiftAI: This file is for the ropeway's artificial intelligence. It is not necessary for you in this tutorial!
SampleModLift.LUA: This is the most important file. This file contains most of the information about your ropeway, and also contains several important indexes. Here's a little overview of what the different keywords stand for:
Line 1 - 12: These lines are not very important. They won't be loaded by the game, so you can type in anything you want.
Line 13 - 19: In this block important information is inputted! Another little overview:
contentName: This is the name that your mod will have. It won't show up in the game, but while loading your mod, the game checks this name and checks if there is already another mod with this name. If there is, your mod won't be loaded. In this case, you must change the name, perhaps to the name of your lift. I'll call it “tutorial-lift”
title: This is the title/name of your mod. It will show up when building the lift ingame.
fullDesc: This is the description, which will show up in the building menu too.
previewFilename: This piece of code contains the name of your preview image. The image will show up in the ropeway builder.
class & customAI: These lines are not important for you right now.
Line 22 - 31: This block contains important parameters for the ecoSystem.
typeDesc: This is the shortened form of your ropeway's type.
typeDescLong: This is the original form of your ropwway's type.
uphill: This rules if the lift brings skiers uphill.
downhill: This rules if the lift brings skiers downhill.
The following lines establish things such as the hourly costs, price of the lift etc.
Line 34 - 36: These lines aren't important for us right now.
Line 39 - 43: In this block the tensioning force of the lift's rope is settled.
Line 46 - 50: Here is some more information!
ropeDiameter: As the name implies, this defines the rope's diameter (in millimeters)
carrierType: This carrier we want to use on the ropeway. In our case, the content name is “sessel”.
minSpacing: This is the minimum spacing between two carriers ingame.
maxSpacing: This is the maximum spacing between two carriers ingame.
Line 51 - 59: These aren't important components for us right now.
Line 60: This is the type of supports your ropeway will use by default. You will learn more about supports in the 3rd subchapter.
Line 62 - 66: These parameters establish the speed, gauge etc. of your ropeway.
maxSpeed: This is the maximum speed of your ropeway (in m/s).
drivingStation: This line is not important for you when following this tutorial. Normally, it should state if the drive is located in the mountain station or the valley station.
spacing: This is the default spacing of the carriers when building the ropeway ingame (in meters).
gauge: This is the gauge of your ropeway (in meters).
parkingStation: This settles which station is the station where the carriers can park. Due to the fact that this is a fixed grip lift, we don't need to change this parameter either.
Line 69 - 71: These lines settles the different velocities of the slow modes (L1, L2, L2) (in m/s).
Line 73 - 84: This paragraph handles animated objects in your station.
pattern: This is the name of your object, which should move, when the skilift moves.
diameter: This settles the diameter of your (mostly round) object.
axis: This is the axis, on which your object should rotate (x, y or z).
Line 85 - 101: In this big paragraph many very important indexes for the valley station are inputted.
prefab: This links to the prefab of the valleystation. By default, it is called “Antriebsstation” (english: drive station)
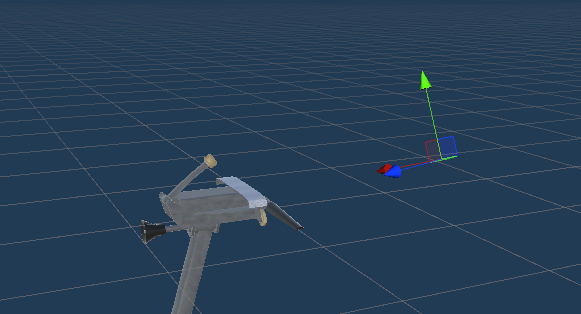
thumbnailCameraIndex: This is the index to the camera, which shows the station in the ropeways menu ingame. Attention: The blue arrow indicates the direction that the camera will have.
nameLabels: This is linking to the object which shows the name of the ropeway ingame.
position: This settles the position, i.e where the station will be placed (offset)
stationSplines → index: This index links to the spline of your valleystation. Make sure that the names are the same in the Unity hierarchy and in the .LUA file.
stationSplines → name: This is the name of the spline. You can put any name you want, but you don't need to change it.
incoming/outgoingSpline: This isn't important for this tutorial. Just be sure, that these two lines contain the name of the spline, settled in “stationSplines → name”
controlPanelRoots: index to the control panels.
phones: index to the telephones in this station.
The following lines (102-142) set some paragraphs and indexes to the entrance area. These are the most important for you:
Line 102 - 107: These are some indexes, to some special waypoints placed in front of the turnstiles. When your ropeway is out of order ingame, nps will stop at these waypoints.
Line 110 - 121: These lines are for the portioners, which usually open and close when the ropeway is running, to enable the skiers an as easy as possible entry.
triggerSpline: This shows the name of the spline, which the trigger for the portioners should be placed at. When a carrier passes this point, the gates will open and the NPCs will pass. When modding fix gripped lifts as we have it in our case, you only need to out in the name, standing in line 92 [stationSplines → index].
triggerPosition: This is the point at the spline, where the gates open, when a carrier passes. To find the best point of it you'll need to try a bit.
gates: These are indexes, linking to the portiones gates and their associated waypoints.
Line 122 - 134: These lines of code are for the conveyor belts at the entry area. They explain themselves.
Line 135 - 142:
entryWaypointSpeedScale: This establishes the NPCs' velocity on the conveyor belt
entryWaypoints: these are indexes to the waypoint, where the NPCs stop and get into the chair, as soon as it had arrived.
Line 145 - 151: These are linkings to the sounds of the drive station. You can replace sounds in Unity, by selcting them and change the Audio-Clip in the component Audio Source in the inspector window.
Line 152 - 163: These lines link to object, that can be toggled by a switsch in the command room.
sessel.LUA
This file settles all parameters and indexes for your carrier.
Line 1 - 11: those are comments and they will not be read by the game.
Line 14 - 18
contentName: This part sets the Name, which your carrier be named like, if you change it, you will also need to change the “carrierType” in the SampleModLift.LUA
title: This is the name of your carrier. you can type in anything you want.
fullDesc: The description for you carrier.
previewFilename: The link to the preview image in your lift's folder
Prefab: Antriebsstation
Prefab: Gegenstation
Prefab: Sessel
Now you can finally test your ropeway! If you have any questions, or further problems please leave a message in the #modding channels on our Discord Server


