

meta data for this page
Ingaming Guideline Ropeways - Advanced
In this tutorial you will learn how to ingame a detachable ropeway. If you have no experience in the field of ingaming, then work through the Beginner Guideline first.
Please make sure that Unity 2019.1.14f1 and the Modding SDK are correctly installed!
To edit the datatables it is recommended to download Visual Studio Code.
Chapters in this article:
SetUp
1. First, you create a folder for your project. To do this, go to the folder in which you installed the Modding SDK. In my case, that's C:\Desktop\Unity Modding. Next you follow the path Assets\Mods and create a folder with the name of your project. For example Tappenalm.

2. In order to have a better overview, you should create individual subfolders. For example: 3d models, textures, material, scripts

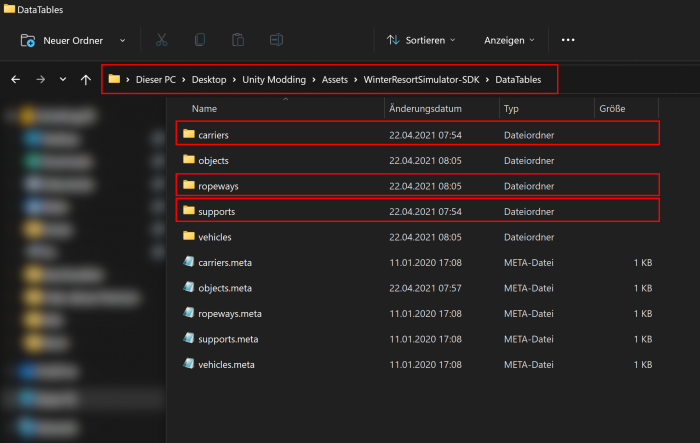
3. Perfect. Next you need to copy some scripts from the SDK. The path Assets\WinterResortSimulator-SDK\DataTables takes you to the datatables.
Then you go to the folders carriers, ropeways, supports and copy one script each into your project folder. In my case I need the scripts Sonnenbahn.lua, DCD8.lua, Revision-8CLD.lua and EUBSupports.lua.
An explanation of the scripts can be found here.
4. To load your mod you need the mod.lua, you can find it under the following path: Assets\WinterResortSimulator-SDK\Template. Copy them and add them to the script folder.
5. If you have already textured your 3d models in Blender, you can drag the textures into your textures folder.
It is important that the files have the same name as in Blender. If this is not the case, the textures won't be displayed on the 3d model.

6. Next, you drag your 3d models into the folder 3d models.

7. Now you can open Unity. The path Assets\Mods\Tappenalm\3d models takes you to your 3d models.
8. Select all 3d models and uncheck the boxes Import Cameras and Import Lights in the inspector area and check the boxes Read/Write Enabled and Generate Collieders. Then click the Apply button to save the settings.

9. Finally, you drag your 3d models individually onto the Scene and then drag them to the folder Tappenalm. Unity will now ask you if you want to create a prefab, just click the button Prefab Variant and rename the file, in my case to Gegenstation.
10. If you double click on one of the prefab files you will open the file. Now you can assign materials with texture to your 3d models. Each step is saved automatically by Unity, and this feature enabled by default.

11. Next, name all the parts of your 3d model correctly, create subfolders if necessary and put everything in a meaningful sequence. This step is not absolutely necessary, but you will have a better overview yourself and players will be able to customize your ropeway more easily with the “Ropeway Customizer” modification (available for download on the steam workshop).

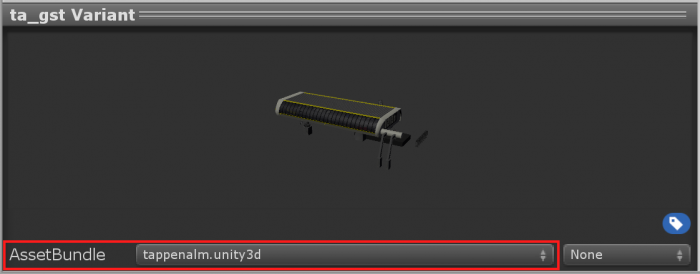
12. The last thing you do is create an assetbundle for your mod. Just click on the assetbundle line in the lower right corner and create a new assetbundle. In my case, I call my assetbundle tappenalm.unity3d.
It is important that the AssetBundle ends with .unity3d!
Now select the AssetBundle you just created for all other files for your mod.
Perfect, now you are completely set up and you can start with ingaming!
Carrier
At first, we create the prefab for our carrier. After we done this, we put our Materials on our mesh.
Now write the name of your prefab in the passage called “prefab”:

After we’ve done this, you have to figure out the Index from our suspension like it’s shown in the picture:

Now we will paste the index from our Suspension in the passage rotXIndex. Important: Parent your 3d model like this:

Now just put the index of your suspension in this passage.

Now, create your door (or bar) animation and put the index of your mesh or empty where you put your animation component on it:

That’s how the animation part in the data table should look right now:

Now we will register the Number Labels in the data table, now it should look like this:


Now, that our carrier are already numbered you must of course still be able to sit in there. For this we Create an Empty and put a Box Collider on it, after you’ve done this, scale the collider and place it. Then crate two other emptys, one of them you call “cam” and the other one “leave”. After that you have to place the empty “cam” as you would like to have your camera for the seat. Now you place the empty “leave” slightly below the seat so that you don't get stuck in the ceiling of the cabin when you get out. Right away it should look like this:

Subsequently we register the Indexes from the seats. For this, we take the parent from the seat and register it right here:

Next, we take the index of the we empty called “cam”, and register it here:

We do the same thing with the “leave” Empty and put it in here:

Afterwards, copy the seats as many times as you need them for a carrier, in this case 6 pieces:

Since we’ve done this, we create two emptys, one of them we call “ExterieurCameraRoot” and the other one “ExterieurCamera” and parent it like this:

Put the Indexes in like this:

Now, you have a working Camera :).
Additional: If you want to have Static Cameras, just create an Empty and call it ExCam_xy and Place it like this:

That’s how the line in the data table should look like:

Last you have to place the seats for the NPC’s. For this, you create an empty called “skier_xy” and place it where you want your NPC's to sit, as with the seats, you must create as many of these as your carrier can hold. Prent it like this:


The only thing that’s left is to is to register everything in the mod.lua an create an Asset Bundle!

Congratulations, you ingamed your first carrier! :)

Control
DLC Control
If you want to use the DLC Control put these two lines in your data table:
controlClass = DoppelmayrControl,
cenConform = true, If you want your cableway to be Cen compliant (with Danger Buttons).
cenConform = false, If you don't want your cableway to be Cen conform (with Emergency Stop Buttons).


Structure of the pushbutton
Each pushbutton is a GameObject, which is constructed as follows:
NameOfTheButton, see below = The base of the button. It also contains the animation and the trigger with which the click is caught).
B5P_Button (= Object that is clicked)
ButtonLabel (= The button label):

Structure of the LEDs
Each LED is a GameObject, which is structured as follows: NameOfTheLEDs, see below (= Here is the animation and the trigger with which the click is caught). B5P_Button = Object, to which the game assigns the correct material e.g. red For Gefahraus) ButtonLabel (= The label of the LED):

Structure of the switches
Each switch is a GameObject, which is structured as follows: NameOfSwitch, see below (= The socket of the switch. It also contains the trigger with which the click is caught). B5KRL_Button (= The actual switch) SwitchLabel (= The switch label) And some more rot labels:

Names for Buttons and Switches
| Button (B) & Switch (S) Names | Game Object |
|---|---|
| Control Voltage (S) | ControlOn |
| Driving Direction (S) | Direction |
| Automatic start (S) | AutomaticLaunching |
| Slow Speed (S) | Slow |
| Passengers (S) | Passengers |
| Stations (S) | StationsStaffed |
| Launch (B) | Reset |
| Run (B) | Run |
| Ready (B) | Ready |
| Driving Speed (S) | DrivingSpeed |
| Stop (B) | SD1 |
| Emergency Stop (B) | SD3 |
| Danger Without Fast Conclusion (B) | SD2 |
| Danger With Fast Conclusion (B) | SD4 |
| Danger 2 (B) | SD5 |
| Signal (B) | Ring |
| Auxiliary (S) | AuxReady |
| Lamp Test (B) | LampTest |
| Horn acknowledgement (B) | ResetHorn |
| DepartureDSTunoccupied (B) | RunDSTUnstaffed |
| LED's | |
|---|---|
| Operating brake Closed | LEDBrakeEBClosed |
| Operation Brake Opened | LEDBrakeEBOpen |
| Safety brake Closed | LEDBrakeSBClosed |
| Control Voltage On | LEDControlsOn |
| Available | LEDReset |
| Ready | LEDReady |
| Setpoint0 | LEDTargetSpeedZero |
| Driving speed 0 | LEDZeroSpeed |
| Drive | LEDRun |
| Without Passengers | LEDWithoutPassengers |
| StopDST | LEDSD_1DST |
| Emergency Stop | LEDSD_2DST |
| Driving out DST without fast closing | LEDSD_2DST |
| Driving out DST with fast closing | LEDSD_4DST |
| Danger 2 | LEDSD_5DST |
| StopRST | LEDSD_1RST |
| Emergency Stop RST | LEDSD_3DST |
| Driving out DST without fast closing | LEDSD_2RST |
| Driving out DST with fast closing | LEDSD_4RST |
Stations
At first Create a prefab.
Supports
Possible Bugs
This article is still under development
In case you are facing difficulties, feel free to reach out to our modding community on the official WRS discord server in the #modding chats!