

meta data for this page
Ingaming Guideline - Beginner - Vehicle
In this tutorial you are going to learn how to ingame a vehicle, based on the Pistenbully 600 from the SDK.
General
To create a vehicle for the Winter Resort Simulator you will need to install the Modding SDK install the Modding SDK. In our case, we name the Unity Project “Tutorial_Pistenbully600”, but you can give it any name you'd like. After installing, you will need to browse to Tutorial_Pistenbully600\Assets\Assets\WinterResortSimulator-SDK\Vehicles.

Here you have all the files from your Unity project. This location is useful if you want to import your own models and textures for modifying the vehicle.
Afterwards, you head to Tutorial_Pistenbully600\Assets\Assets\WinterResortSimulator-SDK\Vehicles\Pistenbully600. Now you can see all files & folders in the project window on the bottom of the screen.

But what are all these files & folders even good for?
Body: Here you can see the textures from the body of the Pistenbully 600.
Bottom: Here you can see the textures from the bottom (chassis) of the Pistenbully 600.
Decal: Here you can see the textures, material and .fbx model from the decals of the Pistenbully 600.
Heckaufbau: Here you can see the textures from the rear superstructure (engine cover) of the Pistenbully 600.
Interior: Here you can see the textures from the interior of the Pistenbully 600.
Light: Here you can see the textures from the lights of the Pistenbully 600.
Materials: Here you can see the materials from the Pistenbully 600.
Screens: Here you can see the textures from the screens of the Pistenbully 600.
Animations: (DoorLeft, DoorRight, PB600_LeftFlap, PB600_RightFlap,)
Sprites: (PB600SoloLogo, PB600WLogo, PistenbullyLogo) which are the shop pictures.
Scripts: (Pistenbully600W.lua, Pistenbully600Solo.lua, mod.lua) which will be very important later, if you want to make some changes to the functions.
3D Models: (Schild, Screens, Winch, PB600, Fraese) These are your 3d models which can be edited with external software. The files within the SDK come as .blend and can be opened and edited directly in Blender.
Prefabs: (PB600Solo_gameready, PB600_gameready) which are important for index changes afterwards.
The next step is to prepare the mod.lua file
Important: You will need to add 2 extra lines to this file.
targetGame = “WRS-S2”,
supportsMultiplayer = true,
It should look like this:
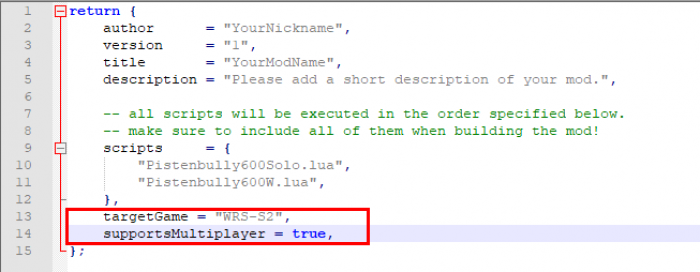
You can change the author “YourNickname” to any name you want, make sure its in the “…”
You can change the version of the mod by changing the number “1” to any number of your choice.
You can change the title “YourModName” to the modname you would like.
You can change the description of the mod. For instance, it is displayed to the player in the mod manager screen before entering a game.
Summary for the Pistenbully600W.lua, Pistenbully600Solo.lua:
Lines 18-29:
There is some general information about the vehicle.
contentName: is the name of the vehicle in the savegame (Be careful! If you change it later and you have placed the vehicle on a map, it will be removed.)
title: is the name of the vehicle in the shop.
fullDesc: is the description of the vehicle in the shop.
techSpecs: Technical information about the vehicle should be put here. It will be displayed in the shop.
previewFilename: is the name of the shop picture sprite which should be in the assetbundle (more information on that later).
logoFilename: is the name of the logo from the company which your vehicle belongs or is associated to. It is a sprite image which should be in the assetbundle (more information later).
author: is the name of the creator displayed in the shop.
shopCategory: This determines which shop category the vehicle will be found within.
price: will be the price of the vehicle in-game.
depreciationPeriod: is the daily maintenance expense of the vehicle.
class: is the type of the content. For a vehicle, this will naturally be “Vehicle”.
prefab: is the name of the prefab of the vehicle which should be in the assetbundle (more information later).
Line 30:
The vehicleScripts table contains a list of all scripts used by the vehicle.
The next step is very important:
Both scripts and prefabs have to be converted following the Conversion guideline to continue. The reason for this is that there have been noumerous changes in Season 2, which the SDK has not yet been updated to include.
If your vehicle is fully converted, you can move on to the next steps.
Assign the following Files to the assetbundle (marked blue):

PistenBullyLogo, PB600WLogo, PB600SoloLogo, PB600Solo_gameready, PB600_gameready, mod.lua, Pistenbully600Solo.lua, Pistenbully600W.lua,
When everything is assigned, you will be ready to build the mod!